Hello again and welcome
to the fifth installment of Luthier’s Corner. In the last 2 installments,
I discussed the importance of properly setting up your
guitar or bass, with a focus on different types of pickups
in last month’s issue. This month, I’m going
to discuss the different types of bridges that you will
find on various different styles of electric guitars and
what makes them unique from each other as well as how to
do various adjustments on them.
Basically, you have 5 main types
of guitar bridges, with variations on each. They are,
the Gibson style tune-o-matic and stop bar tailpiece,
the wraparound anchored bridge commonly found on Les
Paul Jr’s-with intonatable
saddles or fixed saddle, the Telecaster style 3 or 6 saddle
bridge with pickup mount cut into the plate, the Stratocaster
style tremolo bridge, and the Floyd Rose style locking
tremolo.
Of course, as I said, each of these
types of bridges have variations on their designs, depending
on different manufacturers and are explained below.
 |
 |
 |
 |
 |
 |
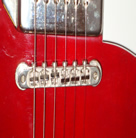
Pic A
Gibson style
tune-o-matic |
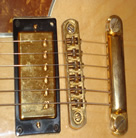
Pic
B
Gibson style
tune-o-matic
|
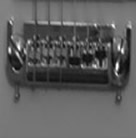
Pic
C
Wraparound Bridge |
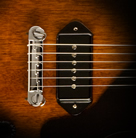
Pic
D
Wraparound
anchored bridge
|
Pic
E
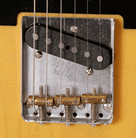
Telecaster style
3 saddle |
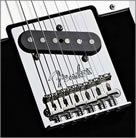
Pic
F
Telecaster style
6 saddle
|
 |
 |
 |
 |
 |
 |
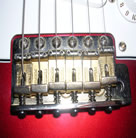
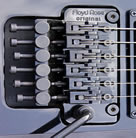
Pic G
Stratocaster Style
Tremelo Bridge
|
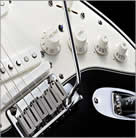
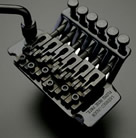
Pic H
Stratocaster style
two Post Type
|
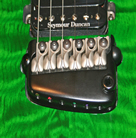
Pic I
Floyd Rose style
locking tremolo |
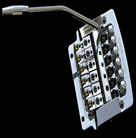
Pic J
Floyd Rose style
Non locking tremolo |
Pic K
Parker bridge |
Pic L
Kahler Bridge
|
-
Tune-o-Matic
Bridge basically
comes in 2 types, and really, the main differences
between them are the mounting height posts. On USA
type bridges, you’ll notice
that the height posts are around 1/8” thick,
and either have a threaded post and separate thumbwheel
assembly, or the more modern type of threaded height
post with the thumbwheel built into it, and the whole
post actually threads into a separate anchor. Import
style bridges have larger posts, that are usually
slotted for a flat head screwdriver, which thread
into larger anchors in the body. These types of bridges
have 6 individual saddles that adjust laterally,
or back and forth, via a small flat head screw driver.
Some imports use screws with size 1 Phillips head
screws as well. So when making intonation adjustments
on these bridges, have your small flat head or Phillips
screw driver handy. Bear in mind that usually these
saddles cannot be adjusted for individual heights.
To adjust the height of the bridge, if you have a
USA type bridge, simply turn the thumbwheel until
the bridge raises or lowers to your desired height.
To adjust the height of the import bridges, use a ¼” flathead
screwdriver to turn the posts until the bridge is
at the desired height. Please see pic A for USA style
and Pic B for import style.
-
Wrap Around One
Piece Bridge, commonly
found on Les Paul Jr’s and similar guitars. These
are fairly straightforward. If yours is one of the better
quality bridges, with individually adjustable saddles,
the lateral adjustment of each saddle is the same as the
tune-o-matics described above. These bridges also have
a lateral screw behind each height post. These can be adjusted
using a flathead screwdriver, or Allen Wrench, depending
on the design, to move that side of the bridge back or
forth for even greater intonation adjustment. If it’s
just a stop bar tailpiece type wraparound, then the
only adjustment that can be made is with the lateral
screw behind each height post. Please see pic C for
bridge with saddles, and pic D for non saddle adjustable
type.
-
Telecaster Bridges are a
lower profile bridge than the 2 described above, and therefore,
Fender style guitars tend to have a different sort of feel
to Gibson style guitars because of the shallower neck angle
of a Tele or Strat style guitar compared to the steeper
neck angle of a Gibson style guitar. The interesting thing
about Tele style bridges is that the bridge pickup is incorporated
into the bridge itself, making the bridge serve a dual
purpose-it holds the strings in place, and is also a mounting
plate for the pickup. The vintage style Tele bridge typically
has 3 saddles that each have a pair of strings over each.
The saddles of these bridges often have height screws that
are actually slotted to be adjusted by a small flathead
screwdriver. More modern ones usually have similar screws,
but instead of being slotted, the screws use an Allen wrench
to adjust the height. There are other Tele bridges that
have 6 individual saddles, one for each string, and adjust
the same as described for the 3 saddle. Each saddle of
either bridge is also secured with a lateral screw that
is adjusted using a small Phillips screwdriver for intonation.
Please see pic E for 3 saddle, and pic F for 6 saddle.
-
Strat Style
Tremolo Bridges are
similar, saddle wise, to the 6 saddle Tele bridge,
with the exception of not having the bridge pickup
mounted in the bridge plate, are usually anchored,
in the front edge, with either 6 fulcrum screws,
or 2 height adjustable fulcrum screws. The bridge
plate itself is mounted to a sustain block that is
anchored through the body with up to 5 springs which
counteract the string tension and return the bridge
to what is known as “zero” position
after pushing the tremolo bar downward, to drop the
pitch of the notes played, or pulling up on it, to
raise the pitch. Making sure that the bridge returns
to the same “zero” position
each time the bar is used is important to maintain
tuning stability. Naturally, there are other things
that should be done aside from maintaining the “balance” of
the tremolo bridge for tuning stability, such as installing
locking tuners, a graphite or roller nut, etc. We’ll
tackle that sort of stuff in a future installment.
Please see pic G for 6 screw mount type, and pic H
for 2 post type.
-
Floyd
Rose Style Locking Tremolo. These
usually require you to cut the ball end off of each
string and lock them into their respective saddles
using the appropriate sized Allen wrench. The intonation
on these are set by loosening a hold down Allen screw,
located at the front of each saddle, and sliding the
saddle back or forth until the intonation is correct.
Then you lock that screw back down. Bear in mind, it’s highly
recommended that you loosen the string before unlocking
the hold down screw and making the necessary adjustments.
Also, unlike all of the previously mentioned bridges, a
Floyd style locking tremolo is a bit more advanced and
not really recommended for a beginning guitarist to work
with. Some Floyd style bridges don’t actually
lock each string at the bridge and actually require
you to NOT cut the ball ends off so you can just
pull the string straight through the saddle. All
the other adjustments are the same as the locking
version of the bridge. Please see pic I for locking
type, and pic J for string through type.
Naturally, like I said, there are variations
to each of these bridges, many with their own unique adjustment
techniques, but they all are based on these 5 fundamental
designs. These descriptions were intended to help familiarize
you with the different types of bridges out there, but
by no means intended to ignore other types such as those
made by Parker Guitars, Kahler bridges, etc. They too all
have adjustments similar to those described. Please see
pic K for Parker bridge and pic L for Kahler type.
Once again, thanks for reading my column and remember
no task worth accomplishing is ever achieved if not pursued
with fierce dedication. Believe in yourself, and make happen
that glorious noise called music! Until next time, remember,
there is nothing you can't do if you set your mind to it!
Cheers!!
|