|
Hello again and welcome to the fourth
installment of Luthier’s Corner. Last month, I explained how
the basics on proper setup and maintenance of your guitar/bass.
This month I’m going to go into a little more detail
about the different types of pickups that you find on the
many different guitars out there. The fact is, truly no
2 guitars are alike, even those that bear the same name,
due to different grains in the wood, etc. Well, the differences
between 2 different guitars, from 2 different guitar companies,
that use very different building methods are even more
stark. For example, a Gibson Les Paul and a Fender Stratocaster
play, feel, and sound completely different from each other.
Why is that? Well, we’re going to find out.
Since the guitar was first invented,
luthiers have been trying to improve upon the design,
and still do to this day. It’s the “better mousetrap” syndrome.
Don’t try and look up that term, I just made it up.
Haha. Anyway, in the early part of the 20th Century, the
Gibson guitar company put a single coil pickup on an archtop
guitar, called the ES 150 guitar, and suddenly the guitar
could be amplified. This guitar was made famous by one
Charlie Christian and the pickup that was used was nicknamed
the Charlie Christian pickup. What exactly is a pickup,
you ask? Well, basically a pickup consists of a magnet
that has very thin copper wire wrapped around it, several
thousands wraps, that is housed inside some kind of form,
and wired either to a volume and tone circuit, or directly
to a jack. The types of magnets, coils, and even bobbin
materials, are what make each pickup sound unique and offer
so many tonal options. This is where it’s imperative
to really use your ear in determining if the guitar you
want is ideal for your particular playing style and tastes.
Let’s talk, for a moment, about the different magnets
used in the construction of pickups. This is important
because pickup magnets have differing magnetic strengths
and therefore require different height requirements in
conjunction with the strings. Set certain pickups too close
to the strings, and the intonation and sustain affected.
Basically, there are 3 types of magnets used in pickups
today. They are AlNiCo, Ceramic, and Neodymium. Let’s
look at Alnico first. It’s called AlNiCo because
it’s made of a combination of Aluminum, Nickel, and
Cobalt. The most common that you hear about is Alnico 5
and pickups that have Alnico 5 magnets are usually sought
after because of their vintage tonal quality. However,
the aforementioned Fender and Gibson companies used Alnico
5 magnets in very different easy from each other. Vintage
spec Fender single coil pickups actually have 6 individual
Alnico 5 magnets as the polepieces. Therefore, the magnetic
pull is very strong, which is why those pickups have to
sit deeper into the body, or much lower from the strings,
than say a Gibson PAF humbucker. Gibson uses an Alnico
5 bar magnet between the coil bobbins and the baseplate
of the pickup, and each coil has a row of 6 metal polepieces
that touch the bar magnet. One row of polepieces is actually
height adjustable. This arrangement actually spreads the
magnetic field over a wider surface, therefore making it
easier to have the pickup closer to the strings than a
Fender single coil without intonation or sustain problems.
Of course, there are other Alnico magnets being used, and
they are numbered as Alnico 2 and Alnico 3. Basically,
they have a somewhat weaker magnetic pull and pickups that
use these magnets do so to emulate the sweet tonal characteristic
of a 50’s Gibson PAF humbucker whose magnetic pull
has weakened over time. Gibson also makes a single coil
pickup called a P90 which is considerably bigger than a
Fender single coil, and sounds fatter because of the construction.
 |
 |
 |
 |
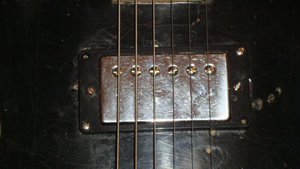
Gibson PAF with the cover |
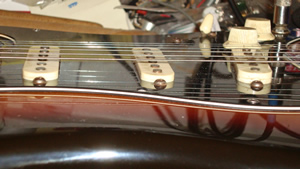
an SG that has a P90 in the neck and a Dimarzio humbucker
in the bridge position. showing what a typical humbucker
looks like without the cover |
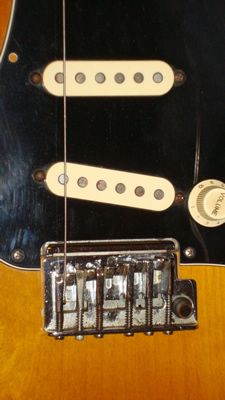
the polepieces of a typical Strat pickup, in a pickguard,
whether Alnico or with ceramic bar magnet |
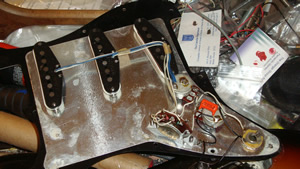
underside of a typical Strat pickguard showing the
individual Alnico magnet polepieces. |
OK, ceramic magnets are
used in certain pickups for a more modern sound, due to
it having a more compressed distortion capability and is
a favorite with many heavy metal guitar players. It’s
not impossible to get a smooth tone out of ceramic magnet
pickups, but they tend to just lend themselves better to
harder styles of rock music. All pickups that have ceramic
magnets, have them either glued to the underside of the
housing, as on Fender-style single coils, or mounted between
the coil bobbins and baseplate in a Gibson style humbucker.
The third type is Neodymium, or Neo.
Neo magnets are perhaps the most powerful magnets on
the market today, and therefore their use in guitar pickup
construction isn’t too
common, but there are makers who use them. They are usually
used as speaker magnets, but you will find guitar pickups
that use them in specific applications.
OK so now that we know the basic
differences in the types of magnets used, how do you
determine what type you have? Well, if you have a Strat-style
guitar, the easiest thing to do is take off the pickguard
and look at the underside of the pickups. If you only
see 6 polepieces and no bar magnet, then your single
coils are Alnicos. If you see a bar magnet, then it’s ceramic. If you have a Gibson
style guitar, it can be hard to determine what the bar
magnet is if there isn’t a sticker on the underside
of the baseplate. If it’s a real Gibson humbucker,
the best thing to do is cross reference the model number
of that pickup with the specs on the Gibson website to
determine the magnet type.
 |
 |
 |
The ideal heights for 3 Alnico
Strat pickups compared to string heights |
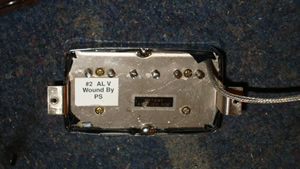
Underside of a typical PAF
Alnico
5 Gibson humbucker |
the underside of a typical single
coil pickup with
a ceramic bar magnet. |
OK well, when it comes
to setting the proper distance between pickups and strings,
the first thing you want to do is lower the pickups as
far as you can without them falling off the mounting screws.
After you do that, starting with the bridge pickup, begin
to raise the pickup to where it sounds good to your ear.
Of course, your guitar is plugged in and the amp is set
on the clean channel, right? Make sure that you actually
hold both “e” strings
down the highest fret while doing these adjustments. That
way, you will be able to see, more accurately, what the
real distance is when the strings are fretted at the highest
frets, not just based on open strings. As you raise the
bridge pickup, pluck the fretted string. If the note starts
to warble, then the pickup is too high and you have to
lower it until the warbling stops. Once you find that “sweet
spot”, move on to the middle pickup (if your guitar
has one) and then the neck pickup. Their adjustments are
actually slightly different in that the goal is to get
their output levels, or volumes, to match that of the bridge
pickup. The last thing you want is your neck pickup being
much louder than your bridge pickup. Output balance between
all pickups is essential for a balanced sounding guitar.
Now you’ll have a guitar that sounds good, with a
consistent output level between all pickup positions, and
since you’ve done a setup on it, thanks to last month’s
article, it plays great as well.
OK so it looks like I went longer
on the history of guitar pickups and the basics of pickup
construction than I expected, so tune in next month for
my discussion on the differences between Gibson-style,
Fender-style, and locking bridges and how to properly
set them up. Once again, thanks
for reading my column and remember no task worth accomplishing
is ever achieved if not pursued with fierce dedication.
Believe in yourself, and make happen that glorious noise
called music! Until next time, remember, there is nothing
you can't do if you set your mind to it! Cheers!
|


